Have You Booked Your Solar Eclipse Viewing Party Yet…

Its not too late to reserve a solar eclipse viewing party near you. August 21st is the total solar eclipse and whole world is excited about the natural  celestial event. Weird stories including Lizard men in South Carolina and sold out Porta Potties in Oregon make us wonder more about the Total Solar Eclipse.

Solar Eclipse


Source: NASA

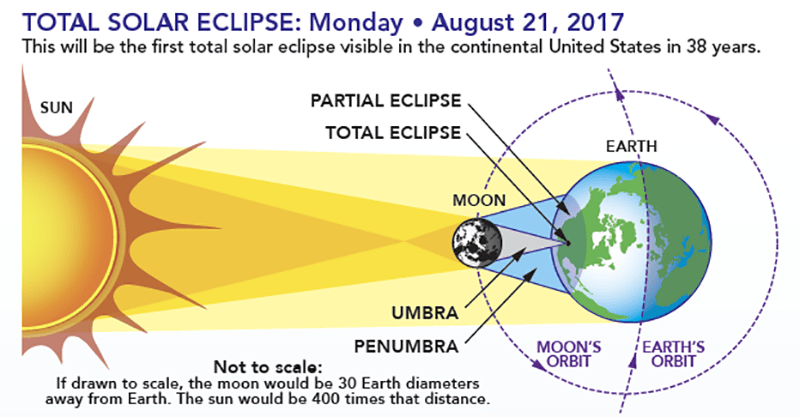
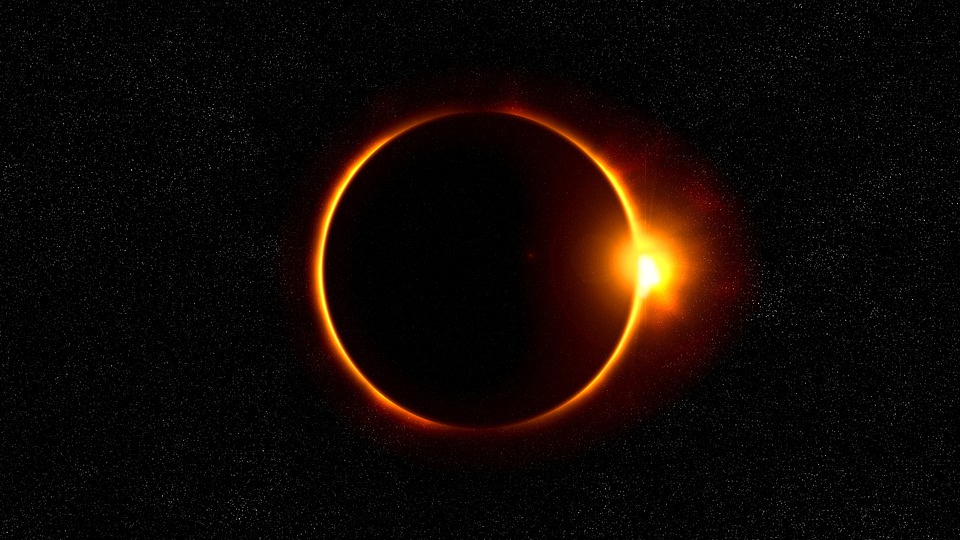
Solar eclipse is the natural event in the space when the moon comes in between the sun and earth. Then, the people on earth are unable to see the sun for a few minutes to hours. You may remember that the earth rotates on its own axis and revolves around the sun. Moon revolves around the earth and during the solar eclipse, it appears that the moon is blocking the sun. Only few parts of the earth are able to view total solar eclipse, while others can see partial solar eclipse.


Viewing Parties

All the public libraries and museums are arranging viewing areas to see the solar eclipse. Private groups are getting together to see the solar eclipse. In Oregon, all the Porta Potties have been pre-booked for the solar eclipse viewing parties. In South Carolina, police are warning people not to kill the Lizard men that may appear during the solar eclipse. Lizard men are weird humans similar to Big Foot and police are requesting to report any sightings. 🙂

Some cultures ban viewing the solar eclipse as it is perceived to be bad. Some prevent cooking or eating during the eclipse as the bad rays tend to spoil the food. Some pregnant women avoid going out during the eclipse as it may harm the baby. Scientists are arguing that the plants and animals may behave differently during the solar eclipse.

After 38 years, the United States is getting an opportunity to view the total solar eclipse though there were partial, annular, and hybrid eclipses after 1979. Electric and solar operators are concerned about the operation of the solar equipment and power plants during the solar eclipse.

Safety

NASA is emphasizing the safety during the solar eclipse. Experts are warning not buy cheap solar glasses and normal sun glasses are not suggested for viewing solar eclipse. Organizers of the viewing parties are arranging for safe glasses that are good for viewing the solar eclipse.  Cheap glasses can be spotted by holding them against car head lights at night. If the light is passing through the glasses, they are not safe for eclipse viewing and can damage the eyes. Special eclipse glasses are manufactured that can block the ultra violet and infra-red rays during the eclipse.

Solar Eclipse Viewing 

Solar Eclipse of 2017 in the USA is first visible in Oregon at 9 am. The eclipse will pass through Oregon, Idaho, Wyoming, Montana, Nebraska, Iowa, Kansas, Missouri, Illinois, Kentucky, Tennessee, Georgia, and North and South Carolina. The maximum time of 2 minutes and 38 seconds eclipse can be viewed in Carbondale, IL. The eclipse will end in South Carolina at 2pm.

Some eclipse chasers are tailgating the path in the USA while others are travelling out the country for different experience. Special Amtrak trains to Carbondale, IL are already sold out! About five hours drive from the Quad Cities, Carbondale is having the largest viewing events.

Quad Cities Solar Eclipse Events

In the Quad Cities, local libraries are passing out safe sunglasses and arranging the viewing areas. Some libraries are having preparatory events before August 21.

  1. Moline Public Library: 11.30 am to 2 pm. Sponsored by Popular Astronomy Club Quad Cities
  2. Putnam Museum: The event is sold out, but you can check for any cancellations. From 11 am to 2 pm, there will be presentations and live casts.
  3. Rock Island Public Library: 11.30 am to 2 pm. Offering free eclipse glasses for first 100 viewers.
  4. Davenport Public Library: 12pm to 2 pm. Making pin-hole cameras and eclipse viewing
  5. Bettendorf Public Library: 12.30 pm to 2 pm. Free glasses available or make pin-hole cameras.  Special presentations about the solar system

Next total solar eclipse in the USA is in 2045. Some parts of the world may not see the solar eclipse at all. For kids, this is a right event to view the science they studied in the text books. Some universities have declared holiday for the solar eclipse viewing on August 21, 2017. So, gear up for the grand solar eclipse this year and let me know how it went. Many are complaining that the solar eclipse is falling on a week day, but we can’t control the sun ha 🙂

Fan Review

Shah Rukh In and As Fan is another evidence of the actor’s peak acting skills. The makeup and cinematography made the double role blend naturally but Shah Rukh’s action proved the negative role also is correct. 🙂 Only to his fans though!

With the technology, information is being transmitted at the finger tips before an event actually happened. Social media has made private lives public for common people. For celebrities who are under constant vigilance of the paparazzi, there is no more privacy. Stalking of celebrities are a common news now. Pictures of extreme private nature are being freely transmitted on the web. People getting in to the properties of famous actors, booking rooms adjacent to theirs, hacking in to social media accounts, emails, and so on are similar examples.

This situation has been showcased in the movie Fan. Shah Rukh is a famous actor in the movie and his fan is madly worshiping the hero since childhood. The craze continues in to adolescence and adulthood. Similarity in facial features adds to already possessive behavior. The fan imitates the actor in all walks of life and is often encouraged by the annual acting competitions held locally. Finally, the fan decides to meet the actor and sets off to visit him. However, the actor is having thousands of visitors everyday and is unaware of the fan’s behavior. People at that stage are used to the fan behavior but the actor is unprepared for this particular fan.

Situations turn worse and the fan is neglected by the actor. Fan takes actor’s professional rivalries as his own an ends up beating up the actors rival. There are viral YouTube videos about the incidents. However, this behavior is not encouraged by the actor and warns the fan to stay away from him. I think this was handled in a subtle manner. Most cases, immediately there would be police complaints and or security concerns. Now, the fan takes the matter very seriously and starts attacking the actor posing as his impostor. People start criticizing the actor for the impostor’s actions and the actor sees the issue.

The actor tries to handle it in a different manner by teaching the fan a lesson. But at the end the fan dies by committing suicide post shuffle and dialog exchange. The actor still kinds of remembers the fan whenever he sees the deluge of his fans. The ego and power establishing nature of the star has been shot very well and Shah Rukh is a natural. The craze and madness of the fan are acted out very well by of course our own Shah Rukh again.

I think the movie is depiction of stalking in real life as well. The never-ending trolling of people online and in person. The unnecessary imaginations and attachments lead to one situation or the other. One wise person said – “Love is another form of stalking”, which is true. But, love is suppose to set the other person free and like them no matter what. The relationship (if any?) which is shared between a fan and actor has been exaggerated in the movie. After all, it is just a story. Shah Rukh makes all the bad roles he acted such as in Baazigar and Dar look correct according to the character’s perspective. Similarly, Fan is also showing the same case subjectively.

Also, notice that there are no songs and no major female lead actors in the movie. You are all set to become Shah Rukh’s fans after watching the movie. Let me know what you think! 🙂

Tawk.to – live chat on your website

I recently came across this tool tawk.to that is used for incorporating live chat on your website. What’s amazing about this tool is that it is completely free and can be installed on your android or iPhone as well!

Tawk.to is a web tool that is free to signup. You need an email and a valid website where you want the live chat to be installed.

Once installed, you can manage the chats from your desktop or laptop. Users with valid email address can be configured as an agent. Many agents can be set up and the users can start chatting.


The web chat is a must for all websites who want to sell their products or services. The instant chat lets users get answers immediately. Their queries can be answered and any further sales leads can be developed.

Tawk.to application has inbuilt tracking and analytics of the chat and the website in general as well. It gives you the number of visits and pages where the users spent and so on.

All the chat history and communication between the agents is stored in the application. In addition, agents can answer the chats on the go by installing the mobile app. The chat sessions can be recorded on the phone and stored in the computer applications.

Agents are able to see what the user is typing in real time and it gives time to prepare for the answer. Time when the chat ended, when the user left the website, if the user liked or disliked this tool everything is recorded. The application lets you set the status message as available, away, or invisible.

I thought it is similar to any customer service web application but the answers are not customized or suggested.

Overall, tawk.to is a cool asset for your website and let’s you instantly connect to the user! Let me know your thoughts.

How Social Media Can Improve Your Business

With the age of instant messaging and social media marketing, it is a clear fact that social media can improve your business. It is also proven that the success of your business largely depends on the reviews on all the social media websites. Here are a few suggestions to leverage social media.

Reviews, that can Make or Break
People in modern days have been relying more on the internet to preview a business before placing an order with them. Be it an online business or local business, customers are more and more relying on the reviews online. Word-of-mouth suggestions and opinions are always being considered before spending a dollar. Signing up for a new activity for your child, buying a new software or phone, eating out at a restaurant, all these chores are heavily being done based on the reviews!

Professional Organizations
There are certain professional organizations that provide reviews an ratings of businesses exclusively. These include Yelp, Angie’s List, Better Business Bureau, and so on. Customers look up a business on these websites before approaching a new business. The review providers are charging a heavy amount but you are not assured of the results! Professional associations with other local businesses is also a good way to improve your reach.


Social Media Reviews
Social media such as facebook, twitter, pinterest, instagram, dribble, youtube, google plus, and so on are also other great platforms to create a specific page for your businesses and making contacts through them. You can also leverage Linkedin to create a social presence. It is always better to have your own website to promote your business. The advantage of the social media marketing is that you can track the people and increase your marketing efforts based on the population. Here are some important tips to keep in mind about social media marketing:

  1. You can link your twitter and facebook accounts with the email address. Once you post on twitter, it will be automatically updated on facebook.
  2. In the same way, if you post on facebook, your post will automatically roll on twitter. How cool is that!
  3. Similarly, you can link your YouTube channel with facebook and twitter so once you post a video on YouTube, your other channels are automatically updated.
  4. It is very important to create a Google Business account and add your local address on the Google Business site. Its inbuilt tracking and insights will let you know the number of unique visitors and the type of visitors.
  5. You must create a public page on Google Plus account and link other social media accounts to it. Make contacts with other local businesses in Google Plus. Thus, Google will automatically send traffic to your website based on your local settings.
  6. You can link your WordPress account to facebook and twitter so that your posts automatically appear on all your social media networks.
  7. Also, create separate pages for each of your locations so that when users search for your business in that location, your name will appear.

Social Media also lets you to track the visitors so you can acquire their email addresses and make a email campaign to promote your business. It is important that the reviews on these websites and media are also a deciding factor whether a customer is likely to choose your business or not. With more users heavily relying on the reviews, you can leverage the available tools to improve your business reach.

YouTube Application Program Interface (API)

YouTube is the most popular video source for world wide web users. As a developer, if you would like to embed a YouTube application in your website or application, there are a number of tools available. However, there are some settings and customization required if you want to modify according to your requirements. Here are my insights.

YouTube API

To incorporate YouTube API into your website you will first need a security key or API Code. You can create one for your project by creating a google account if you don’t already have one.

  • After logging in to the Google Developers Console, create a new Project by giving title and description
  • Add corresponding API’s to your project by selecting YouTube Data API’s to start with
  • Create a security key for your project using the left menu for the domain
  • You can also create a OAuth key if required and add the domain and referrers


Connecting to YouTube

On the Google Developers YouTube page, there are scripts available in different programming languages such as Java, JavaScript, PHP, Python, and so on. You can follow the guidelines there to create the pages. If you are using JavaScript, you can create separate java script files and html file as given. However, you can include everything in one html page separating the scripts.

In the code replace the existing sample text with your security key that you generated earlier. Try running the code in a browser and everything must work fine. However, the console may show certain errors such as ‘cannot find property of undefined’ and so on. Start debugging the code and see where the error is occurring.

In most cases, the security key is incorrect or if you are trying to connect from a http to https websites. In other cases, the errors pop up due to the x-frame origin set to the sameorigin. If you check the response of the gapi, you can see the json response and all the resulting video lists.

Search.List

YouTube API has a function search.list which is used to search the youtube videos and get a response. You need to specify a search string and return type. Also, the maxResults or safeSearch options can be set based on your preferences.

Once you get the response json, the next step is to embed the video code of each video in to the iframe player on your html. You can use a player for web,ios, or andriod applications based on your device. Create an id to the iframe and set the source of the iframe to the youtube video code onclick of the video title. You can have a function to append code to the source url. In addition to displaying the video title, you can also display additional details about the video such as the thumbnail image from the json.

Other YouTube Functions

There are other functionalities that you can include in your website such as uploading a video, creating or modifying a playlist, searching a channel, downloading a video, getting the videos from users channel, and so on. The code is already there in the Google Developers, but the rel challenge lies in how you incorporate into your application. It also depends on how you customize the code and also taking care that your application does not crash due to the YouTube API. You also need to take care of the minimum units available per day and always upgrade more depending on the use.

Picking Up High School Courses

Okay, its the time of the year where schools send reminders about picking up high school courses. If you have a child or dependent who is in high school, you will feel the pain or pressure of picking the courses. Ideally, the student is supposed to pick the course, but most parents tend to get confused about which ones are best for your child. Here are some tips from my perspective.

Objective

The main objective of choosing courses in high school is to let the student decide their future. However, the schools have their own way of limiting the students so you have to follow their guidelines. If your child is planning for a college or university, the objective of the high school courses is to meet the college requirements. Th current courses which the student takes will highly determine which college or course they are going to take in college or future. Of course, there is always a chance of dropping the class if they don’t like it. But, it is not advisable as it will not give you the credit or departmental honors in the respective division. So, planning way ahead is mandatory.

Graduation Requirements

Most high schools have minimum number of credits required to graduate from high school. Those vary from 20 to 25 or higher. Any additional credits, it is the students choice. But, in general high schools require 4 years of Math, 4 years of English, 3 years of Social Studies, 2 or 3 years of Science, 4 years of PE, and so on. In addition, Consumer Education or Volunteering may be must. They may also provide two or three Electives. In general, these requirements match the respective state university or community colleges.

Choosing the Courses
It is really amusing how the schools set conditions about choosing the courses. I think they customize the conditions based on their 5 year plans. Also, the schools are highly selective about which students take which courses. Before approving any course, they make sure the students meet certain requirements or test scores.

There are hundreds of courses a school offers under different departments. But, the student is left with only minimum choices after selecting the mandatory courses. The student must select the electives in a manner that his college requirements are met. Dual Credit courses offered at local community colleges might be a good idea to carry the credit to both high school and the college

Choosing orchestra in high school is highly selective. Even though orchestra is considered to be an easy grade, there might be many hours required for each concert. If you take orchestra, it will show your commitment to follow directions and work in teams. Also, it is better to take for four years which show your perseverance over a period of time. The same applies for choir or band.

Choosing a world language is also a big question for many students. Most colleges require a world language as their prerequisites. So, the student is forced, in a sense, to participate in a world language hoping to be useful in future profession. Again, it is suggested that they take the world language for four years in high school.

Students must be watchful about the courses the schools set as mandatory to be selected for a class rank. If you need to be considered for a class rank, you have to take the courses set by the school. Else, you will not have a school rank on your final transcripts! Not fair, huh. 🙂

Clubs and Sports

After the courses are selected you will be given option to take participation in Academic clubs, Debate teams, Student Leadership, and so on. Similarly, it is suggested that you be a member of some school’s sports team of your choice. This will showcase you as an ‘overall candidate’ when you apply for college.

Finally, it is essential the student put in lot of work hours after school to study all the subjects they signed up for. Good work ethics and practice is suggested for success in secondary school that lays foundation for college and future!

The Power of Pega

Pega has turned out to be the most popular platform for building Business Process Management (BPM) and Customer Relationship Management (CRM) applications. Pega has powerful capabilities which can be used by the business and project managers to capture the requirements directly into the application without any need of coding. Pega Systems software has inbuilt features with which capturing and transforming customer requirements into technical details with a click of a mouse. I think Pega is cool is because of its features and easy to use capabilities.

Mega Pega Products

Pega has custom solutions for Marketing, Customer Service, Sales and Onboarding, Operations, and the most famous Pega Platform. Each solution has unique features such as customization and reports generation.

  1. Pega Customer Service has inbuilt directions for the customer service representatives based on the role they logged in or based on the incoming call. The messages can be customized and launched by a supervisor or manager depending upon the independent needs. Reporting is much easier with inbuilt range of reports that can be modified based on your requirement.
  2. Pega Marketing can be used to design, develop, and monitor marketing programs and campaigns which can be customized and prioritized based on the changing requirements. Marketing goals and up sell and cross-sell strategies can be included all in one place. Marketing channels can be unique based on the individual customer and can drive better results.
  3. Pega 7 Platform has cool features such as the Case Manager and Designer Studio which make building applications easier. The business processes can be captured using the Direct Capture of Objectives features. The process flow diagrams can be captured inside the tool and the business requirements documents can be saved in the application itself. You can define the business rules in the work flow diagrams and the process can be directed based on a predefined condition or rule.
  4. Pega Operations is used to drive warranty processes or insurance claims easier with its features. Order management becomes simpler with end-to-end visibility starting from placing the order to delivering the order. Disputes and conflicts can be managed effectively without loss of time and resources.
  5. Pega Sales Automation guides sales processes and handling with its unique capabilities. Guided selling and sales dashboards drive the sales processes which can be effective in managing customers and sales goals. The Pega Onboarding and know Your Customer features lets businesses build applications that meet the business needs.


Pega Customers

Many businesses worldwide have deployed Pega applications to meet their needs. Some of the customers include CISCO, Blue Cross Blue Shield, Linkedin, Farmers Insurance, Wells Fargo, Coca Cola, Expedia, GE Healthcare, PayPal, Xerox, and so on. Pega solutions can be applied in variety of industries including financial services, insurance, healthcare, communications, health sector, manufacturing, energy, life sciences, and so on. Most of the solutions are available in mobile and cloud as well and are compatible with other systems and services.

Major benefits of deploying Pega include:

  • Streamline operations
  • Effective Change management
  • Improve productivity and compliance
  • Increase profitability
  • Simplify and automate core processes
  • Enhance customer engagement

Pega Academy

Pega services include the Pega Academy and forums. The Pega Academy has the course paths and certification options for the Pega users. Some of the basic certifications are free with a corporate email which you try out to get the look and feel of the software. You can download the trial server and observe how the solutions work. Other certifications need corporate credits which your organization can provide if needed.

Try out the Mega Pega and let me what you think about it!

AngularJS Routes with $routeProvider and $stateProvider

AngularJS Routes are used to load different views or states depending on whether you use a ng-Route or ui-Route. The traditional way of linking the pages in your application is just fine, but with AngularJS routes you can handle dynamic binding better and the routes are easier to remember for the user.

Routing with Angular JS allows bookmarking the same url with different categories easier. Routes allow different views to load depending upon the url. Same route can be given to more than one view. For the user, only the keyword appears to be changed, even though the views are loading from different html pages. Basically AngularJS routes are two types:

  1. ngRoute: No nested routes are present
  2. ui.router: Nested routes are present

ng-Route

Include the angular-route js in the script file. You will also need a server for the routes to work. You can set up the Apache Tomcat server. We pass the ngRoute as a dependency to the module while defining an angular module.

var app =angular.module(‘myApp’, [‘ngRoute]);

Using the app.config service, we can define the different routes for the links. The keywords used are ‘when’ and ‘otherwise’. You can have any number of ‘when’ in a $routeProvider provided everytime you return a templateUrl and a controller for that route. For example, in your application you have two menu items, Login and Home. In that case, you have to have two route specified in your $routeProvider. Further, you have to create two additional html pages which have to load in those routes. Also, you have to create two controllers to define what happens in the html pages. Here is an example.

myApp.config(function($routeProvider){
$routeProvider.
       when(‘/home’,{
       templateUrl: ‘home.html’,
       controller: ‘HomeCtrl’
}).
      when(‘/login’,{
      templateUrl: ‘login.html’,
      controller: ‘LoginCtrl’
}).
      otherwise({
      redirectTo: ‘/login’
});
});

Remember to pass the $routeProvider to all the controllers as a function parameter.

myApp.controller(“HomeCtrl”, function($scope, $routeProvider){

});

In the index.html body you have to set up a container or placeholder for the views to load.  The a links are identified in the html with the ‘#’.

<a href=’#/login’>Login</a>|<a href=’#/home’>Home</a>

<div ng-view></div>

ui.router

Include the CDN of the ui.router javascript file in your index.html. ui.router uses a $stateProvider. We pass the ui.router as a dependency to the module while defining an angular module.

var demoapp = angular.module(“demoapp”, [‘ui.router’]);

In ui.router, all the routes are identified with a state rather than a ‘#’ Any number of child routes can be created using the $stateProvider. It uses application state changes to load the views accordingly.

The states are managed hierarchically. $stateProvider is defined inside the app.config service. It defines the different states and templateUrls to be loaded for the states. Each state can also defined along with the parent. Here, in this example, list is the child view of home.

demoapp.config(function($stateProvider){
    $stateProvider.state(‘home’, {
    state: ‘home’,
   url: ‘/home’,
   templateUrl: ‘home.html’,
   controller: ‘CarCtrl’
}),
   $stateProvider.state(‘login’, {
   state: ‘login’,
   url: ‘/login’,
   templateUrl: ‘login.html’,
   controller: ‘BarCtrl’
}),
   $stateProvider.state(‘list’, {
   state: ‘list’,
   url: ‘/list’,
   parent: ‘home’,
   templateUrl: ‘home.list.html’,
  controller: ‘ListCtrl’
});
});

In the child state, you have to specify the parent state. Remember to pass the state to all the controllers as a function parameter.

demoapp.controller(“BarCtrl”, function($scope, $state){

});

In the html, you have to refer to the states in the link. ‘ui-sref’ is used to link the states in the $stateProvider. ui-sref is the wrapper that supports the href in ui-routing. AngularJS will convert the state reference to a href automatically. Also, specify the ui-view to load the views in the container or placeholder.

<a ui-sref=”login”>Login</a>|<a ui-sref=”home”>Home</a><br>

<div ui-view></div>

Routing is pretty simple once you get a hang of it. Just implement and include the correct javascript files in the script tag.

AngularJS Directives

AngularJS directives are a cool way of defining behavior and using it any way you want. You can have a directive with your name and have it do any kind of work you want depending on the situation. AngularJS directives control your DOM behavior.

Directives

Directives guide the HTML compiler to control the elements so they can behave in a certain way. The rendering of HTML inside the AngularJS application is controlled by the directives. Depending on the type of directives, they can be used to change the behavior.  Think about it like the word ‘change’. You can use it to refer to ‘change of clothes’ or ‘spare change’. It depends on the context. Similarly, Directives too can be used to behave differently if used in different contexts.


Built-in Directives

Here are some key details about directives.

AngularJS has some crucial inbuilt directives which can make your application behave in a certain way. Directives can be integrated with the HTML or can be used in the Javascript.

One thing which is cool about directives is its naming. The naming of a directive follows camel case when used in Javascript: (ngApp). Whereas, if the directives are used in a HTML, the name is separated with a hyphen: (ng-app).

There are four basic directives:

  1. ng-app : To auto-bootstrap and initialize an AngularJS application
  2. ng-model : To bind between HTML control and application data
  3. ng-init : To initialize application data
  4. ng-view : To switch between different views

There are many builtin directives, here are my favorites:

  1. ng-controller : To attach a controller class to the view
  2. ng-bind : To replace the text of the element with value of an expression
  3. ng-repeat : To instantiate a template once per item from a collection
  4. ng-hide : To show or hide the given element based on given expression

Directives are defined in a similar way as the Controllers and services. They can be defined using app.directive method. The method takes a name of the directive and a function to define what happens in the directive.


Types of Directives

The four types of Directives are classified based on where they are applied. For example, let ‘kuul-stuff ‘ be the directive you wrote. Then,

  1. Attribute directives : The directive is used to change the attribute of an element                                                                                                            <span kuul-stuff=”expression”></span>
  2. Element directives: The directive itself is used as an element              <kuul-stuff></kuul-stuff>
  3. Class directives: The directive is used as a class                                       <span class=”kuul-stuff: exp;”></span>
  4. Comment directives: The directive is used in the comments section                <-directive: kuul-stuff exp ->

Custom Directives

Custom directives are a cool way of defining your own functionality or workflow. They enhance existing directives and are easy to integrate in the HTML. The custom directives are one of the super powers of AngularJS that makes it build powerful applications. Here are some details about custom directives.

Custom directives are defined using app.directive method. The directive function returns an object in its callback.

myapp.directive (‘myDirective’, function(){

—–     write your functionality—-

});

There are some options which must be specified while writing a directive.

  1. Restrict: Defines the type of directive<br>’A’ = Attribute directive, ‘E’ = Element directive, ‘C’ = Class directive, and ‘M’ = Comment directive. It is better to define Attribute or Element directive so you can determine what element a directive matches
  2. Template: Defines directive output content
  3. TemplateURL: Gives the path of the template to be shown
  4. Controller: Defines a controller in the directive which can be used to achieve a specific task.
  5. Controller As: Defines an alias for the controller so you can refer to the controller’s variables using the alias
  6. Scope: Defines the scope of the directive                                                            ‘false‘ = Default value, which means that the scope of the directive is shared by the scope of the parent. There is no local scope present    ‘true‘ = It means that a new scope is created for the directive. There is local scope present as well as we can access the parent scope.  ‘{}‘=Isolated scope means that there is no link between parent and directive scope. A new scope is created and cannot be accessed outside. Further, the directive cannot access the outside scope.                    It is suggested to have an isolated scope in large AngularJS applications to keep the data safe. However, isolated scope can be accessed outside using some techniques. There is some magic which will be revealed later. Okay, fine. Here is the key. Use the following property to achieve the given purpose.                                                                                                             ‘=’ = Handles two-way binding.                                                                     ‘@’=Passing string values to directives.                                                      ‘&’=External function invocation.
  7. Compile: Compile method is specified to achieve a function as soon as the page loads. It will return a link function. If the behavior occurs only once in the directive, use compile.
  8. Link: Link method is specified to achieve a function similar to compile but it loads after compile. If the behavior occurs multiple times in the directive, use Link.

The order the AngularJS guides the HTML compiler is:                                    Compile–>Controller–>Pre-link–>Link–>Post-link.                                             It depends on what you want to achieve in the directive.


Directive Example

Here is an example of a custom directive.

myapp.directive(‘kuulStuff’, function(){

return {

Restrict: A,

template: <span> Hey, I’m custom</span>,

templateUrl: ‘/kuulstuff/home.html’,

Scope: ‘true’,

Compile: function(telement,tattrs) {

console.log(“Hi, I’m custom”);

var linkfn=function($scope, element,attrs){

element.css(‘background-color, ‘red’);

}

return linkfn;

}),

controller: function(){

console.log(“In the controller”);

},

Link: function(scope, telement,tattrs){

console.log(“In the link”);

},

};

});

This is just ‘some’ information about directives in AngularJS. It may be a bit confusing in the beginning, but if you write more, you will be fine. Write your own directives and let me know how it goes. 🙂

AngularJS Controllers

AngularJS Controllers are where the most magic happens. Think that the controllers of an AngularJS application as the brain. The controllers are super smart and can define what happens on the (DOM) Document Object Model. AngularJS controllers along with the dependency injection form the super power of the AngularJS.

Controllers

Here are some key details AngularJS: How to Begin.

  •  Controllers are attached to the DOM through the ng-controller directive. When a controller is initialized, a javascript object will be created and all the functions in the .controller method can be accessed.
  • The initial state for the Angular $scope is available at the point where a controller is registered. All the properties of the $scope can be defined in the controller and can be accessed through the methods.
  • The .controller method can be used to add the controller’s constructor function to the module. Thus the constructor function is out of global scope.
  • Apart from the $scope, we can send additional parameters to the controller, such as services and functions. It is better to keep a controller as simple as possible. You can define as many controllers as you want in an AngularJS application.
  • A common practice of keeping controllers focused on the required logic is to define services and functions, which can in turn be passed to a controller through dependency injection.
  • Controllers can be nested and inherited. You have to note that the parent’s controller’s methods can be accessed in the child controller. And not vice versa.
  • Finally, remember that the controllers contain Javascript functions and are created by a standard Javascript object constructor and is bounded to a particular scope.

Example

Here is an example of how the Controller is initiated. You have to create an angular app called myapp. Also, you need to declare in the html to tell that it is an Angular application.

In the js:

myapp.controller(“MyCtrl”, function($scope){

$scope.message=”Hello”;

});

In the HTML or template:

<div ng-controller=”MyCtrl”>

{{message}}

<\div>

Your div is binded to the controller using the ‘ng-controller’ directive. The scope of the div is passed to the controller. The scope message variable’s value can be accessed in the div within the dual curly braces. Notice, how the name of the controller is defined with an ‘Ctrl’ and the double quotes used while defining and accessing the controller.

Similarly, you can have any number of controllers in your AngularJS application. You can have different Javascript files for each controller or just put it in one main file. This makes two way data binding easier and keeps your application simple!

AngularJS: How to Begin

AngularJS is the Javascript framework for website development. It is widely popular for the features including modularity and separation of concerns. Here are some of the keywords you must be familiar with in order to build web applications with AngularJS.

Steps to Create

Here are the steps to create an application with AngularJS:

  1. Download the latest angular js file from the Angular website. Or, you can include the CDN in the script tag of your web page
  2. Bootstrap the application with Angular by using ng-app
  3. Create a controller in the app
  4. Create the HTML view in the body
  5. Run the application in a web browser


Angular Keywords

  1. Directives: AngularJS uses the directives to convert static HTML into dynamic Document Object Model (DOM) with the help of special attributes such as:
    1. ng-app: To determine which part of the page will use Angular. It will load the respective module in that part.
    2. ng-controller: To identify which Javascript controller should be used in that part of the page.
    3. ng-model: To determine the binding between model and the input field ensuring two way binding.
  2. Modules: Modules ensure separation of concerns in manageable units. It can comprise all the directives, expressions, controllers, services, and filters. Modules specify how an application can be bootstrapped. Advantages of using modules are:
    1. Easy to declare and understand
    2. Code can be packaged as reusable chunks
    3. Easy to load in any order or load in parallel
    4. Faster unit tests because only relevant modules can be tested
    5. Modules can be used in end-to-end tests to override configuration
  3. Controllers: Controllers are defined by a JavaScript constructor function that is used to augment the Scope. They carry the business logic and determine how the view and model interact. The scope is a mandatory parameter that is passed to the controller.
    1. A controller is attached to the DOM via the ng-controller directive.
    2. Then,  Angular instantiates a new Controller object, using the specified Controller‘s constructor function.
    3. A new child scope will be created and made available as an injectable parameter to the Controller’s constructor function as $scope.
  4. Expressions: Expressions are Javascript code snippets that are placed in dual curly braces. {{ }}. They are used to load model directly into the view. Advantages of using expressions are:
    1. Evaluated in the current scope not in the global window
    2. Evaluation of errors is either null or undefined
    3. Loops, functions, exceptions cannot be handled in Angular expressions
    4. You need to create a controller for complex Javascript functions


  5. Scope: Scope is an object of the application model. It refers to the current context or boundary of the application. Scope establishes a connection between application controller and view. Some of the characteristics of the scope are:
    1. Used to observe model mutations
    2. Used to propagate events similar to DOM events
    3. Can be nested to limit the properties and behavior of application components
    4. A child scope can inherit from the parent scope
    5. Provide a context for expressions to evaluate

There are some other key terms such as filters, forms, routing, and services which are key to an Angular application.

Forget Everything: Just Learn AngularJS!

Angular or AngularJS is the next most powerful Javascript framework out there which is becoming increasingly popular among the tech world. Angular JS along with CSS frameworks such as Bootstrap coupled with the REST services is redefining Website development.

AngularJS

AngularJS was developed by Google and is the most important Javascript framework which makes easier for the developer to maintain the code and achieve the same and better functionality achieved with Javascript. The best part of AngularJS is that it is open source and is having the largest support available of all the frameworks available. The current stable version is 1.4.7 and Angular 2.0 is on the way!

Advantages of AngularJS

AngularJS is similar to Javascript and it can enhance the HTML which will enable it to achieve client side programming. It has inbuilt JQuery support called JQLite which helps us in utilizing almost eighty percent of functions in JQuery library.

Browsers

AngularJS has inbuilt multi-browser support and it works on any browser such as Chrome, Opera, Firefox, Safari, and Internet Explorer. You can access your website from any device, tablet, computer, or desktop. Large-scale Enterprise applications can be developed using AngularJS. AngularJS is widely used for developing Single Page Applications (SPA) which are super light and super fast at the same time delivering unbelievable amount of data to the user.

Design

AngularJS facilitates rapidly changing user requirements and business needs at the same time leveraging the skill sets of Front end web developers. Separation of concerns that is defining the model, view, and controller-makes it easier for modular programming and keeping any changes manageable. Dependency injection and use of patterns is simple with AngularJS. Angular supports the very popular Model View Controller pattern(MVC), Model View View Model (MVVM) pattern, and Model View Whatever (MVW) pattern. AngularJS also supports responsive design which is way more important for modern day websites.

Testing

AngularJS is also super good for testing as it allows testing of Model and Controllers in isolation. AngularJS is designed to run unit testing with Karma, Jasmine and Angular mocks. The interactions between View and other components requires mocking framework to unit test. This can be achieved with AngularJS.

Prerequisites

To learn AngularJS, you must be familiar with Javascript, HTML, CSS, and website development. You also need basics of Java, PHP, and MySQL. You can download the latest version from the Angular website or include the CDN in the script tag of your web page.

Instructional Design in eLearning

Instructional Design is a systematic process in which learning needs are analysed and coursework is developed using range of multimedia tools. eLearning has revolutionized the way people learn. The Instructional Design has enhanced eLearning using adult learning theory and principles.

Instructional Design

Instructional design (ID) and Instructional System Design are often used synonymous but the latter is more broad in nature. ID enhances the learning and creates a framework for engaging the learner. Use of technology facilitates the learning process and metrics. Different ID models and strategies are widely used.


ADDIE Model

ADDIE Model is the core of ID and is widely used by instructional designers and  developers.ADDIE The five basic steps of ADDIE Model are:

  1. Analysis: Analyze learners and goals
  2. Design: Identify learning objectives, outcomes, Subject Matter Experts, and assessments
  3. Development: Develop instructional strategies and plan logistics of how the learning will be delivered
  4. Implementation: Implement the training and test the learners
  5. Evaluation: Formative and summative evaluation of the training and learner feedback

Gagne’s Nine Events of Instruction

Robert Gagne, a popular contributor to ID identified nine events of instruction that assist in learning. Story boarding of a lesson usually follows these nine events to accomplish the learning objective. The ID must take care that learning takes place  in that order in each storyboard.

  1. Gain attention
  2. Inform learner of objectives
  3. Stimulate recall of prior learning
  4. Present stimulus material
  5. Provide learner guidance
  6. Elicit performance
  7. Provide feedback
  8. Assess performance
  9. Enhance retention transfer

Bloom’s Taxonomy

Benjamin Bloom, an educational psychologist proposed three learning domains: Knowledge, Skills, and Attitudes.   After a lesson, the learner must be able to acquire knowledge, gain a skill, or change in attitude. Based on the proposal, Bloom’s taxonomy was developed.

Bloom's Taxonomy
Bloom’s taxonomy Citation: http://www.lincoln.edu/ats/bloom.html

The Cognitive domain is in turn divided in to six categories. They are:

  • Knowledge
  • Comprehension
  • Application
  • Analysis
  • Synthesis
  • Evaluation

For each category, the learning goals have been changed in to verbs. Later, the techniques have been identified to achieve the activity. In Instructional design, Bloom’s taxonomy verbs have been used to create the learning objectives so they can be measured. Further, each learning objective may have only one learning goal (Bloom’s verb).


 eLearning and Instructional Design

Vector laptop or notebook

eLearning has revolutionized how students learn. Adults in particular can pace the learning according to their time and schedule. The class room learning has been replaced by eLearning in many corporations around the world. Security training, induction training, skills training, and so on have been possible for millions of people through eLearning.

Applying Instructional Design principles in eLearning has improvised the learning. The tools and style guides have made the eLearning a pleasure experience rather than mundane text. eLearning and ID have made sure that the learning content is rich with graphics, audio, video, feedback and even simulations. The Level of the eLearning varies with cost and the interactivity involved. Some of the Instructional Design models have also been blended learning where the eLearning is associated with certain level of classroom learning to ensure human interaction.

There are also repositories, forums, and discussion rooms in the Learning Management Systems to add more interaction with the remote learners. Also, the ID faces a challenge of making the eLearning SCORM compliant. Sharable Content Object Reference Model (SCORM) is a collection of standards and specifications for eLearning. Further, the ID also has to ensure that they must not actually remove the content in order to make the screen text concise.

Instructional Design Outputs

In every phase of the ADDIE, there are certain expectations from the ID. These include Project plans, Learner Analysis, Technology Analysis, Table of Contents, Illustrations, Animations, Graphics, Learning Matrix, Schedules, Curriculum, Assessments, Glossary, User guides, How-tos, and so on. Also, there are documents pertaining to the implementation and evaluation which must be prepared and communicated to the customer.

Tools used in ID are Microsoft Office products, Captivate, Articulate, Blackboard, Moodle, HTML, Photoshop, Dreamweaver, Lectora, audio and video editing, and finally testing the final product. Quality checking the storyboards and design is an essential part of Instruction Design. Project management is an essential part of Instructional Design.

Basically, I think Instructional Design is interesting because it involves a lot of learning in terms of content and technology which keeps you engaged while you are delivering quality eLearning to users.

H4 EAD Subsequent Processes

Once you get your work permit through H4 EAD, you must apply for Social Security Number and driving licence. These are some of the documents required to get you an identity and a job in the USA.

Applying for SSN

Social Security Number is acquired for US citizens at birth. For all other immigrants and non immigrants, SSN can be acquired at the local social security office. There are some special cases where you can get a SSN even though you do not have a work permit or work visa. Here are the documents needed for applying SSN once you get your H4 EAD:

  1. EAD card
  2. Passport
  3. Valid I94 either in passport or extended version

Check the work hours of your local SSN office. You are required to take a token at the entrance. At the window, the officer will verify your documents. They will take a copy of your documents and issue an acknowledgement which shows your address, name, date of birth, and so on. The SSN card will be mailed to your address within two weeks.

Applying for Driving License

If you do not have a TVDL, you have to apply for fresh driving license after you get your EAD and SSN. If you already have a TVDL, you can get your driving license without a computer test and road test. The documents required at the DMV include:

  1. TVDL
  2. EAD card
  3. SSN Card
  4. SSN Acknowledgement Letter
  5.  Spouse’s Driving License and Spouse signature (Spouse is required to present at the DMV)

You have to take a token at the DMV. They will verify your documents and issue a token. Once your number is called, the officer will verify your documents. You will be required to take only vision test. Your driving license will be issued for five years from the current date. This is regardless of your date of validity of the H4 EAD card or I94. Again, check the timings and take all the originals. The fee is $30 plus one dollar for service fee if you pay through credit card.

Quad Cities Summer Events 2015

Summer events are plenty in Quad Cities which let us enjoy the best outdoors. With the mighty Mississippi by our side, we get to explore the nature and create beautiful memories. With thousands of people attending, these events make living in the Quad Cities interesting.

Summer Events in Quad Cities

P1020551

Here are some quad cities events which are my favorites:

Rock Island County Fair: The 146th annual Rock Island County Fair is from July 11th to July 19th at 4200, Archer Drive
in East Moline. Most of the grandstand acts are from July 15th to July 18th that is, Thursday through Saturday. Admission fee is $2 for adults, unlimited wristband for $20 which covers all the rides. If you want to get tipsy you can either get on the rides or the beer tent nearby. The fair food is mouth watering such as the curly fries, funnel cakes, french fries, hot dogs, nachos cheese, cotton candy, and of course the Lemonades!!

The grandstand acts include popular artists such as Charlie Worsham on Saturday and Clayton Anderson and Keith Anderson on Friday. This year the Demolition Derby is on Thursday 7pm unlike last year when they had it scheduled for Saturday evening. Get your spirits high for the racing and dashing. Further, check their schedule for more information and do not forget there is free pizza by Dominoes on Wednesday and Thursday from 10.30 am to 1pm.


Mississippi Valley Fair: The 96th annual Mississippi Valley Fair is from August 4th to August 9th at 2815, West Locust St in Davenport. The fair is one of the largest fair in Iowa which costs $10 for the general admission and $45 for fun cards. The fun card lets you in for all the five days including the grand stand acts. Kids 12 and under have free admission on Wednesday Aug 5th. This year the grand stand line up includes Kip Moore, Reba, The Marshall Tucker Band, Styx, The Band Perry, and Big & Rich.

You can visit the Mississippi Valley Fair for the fair food especially the corn and baked potatoes. The rides are $20 from 11 am to 5pm and they have a zip line too. There is also the beer tent and free music. There are some free acts throughout the day which include the alligator show, Dallas the Fire Guy, and Team Rock Karate Show among others.

Citation: http://n.b5z.net/i/u/10002415/i/2015_TugFest_Logo_black.png

Tug Fest: The 29th annual Tug Fest is from August 13th to August 15th in Port Byron, Illinois or Le Claire, Iowa. Illinois has the most wins 17 over Iowa. You can choose the side depending on which side of the river you are. Thursday night is the family night and is free admission to all. Friday and Saturday admission is $3 per person. Don’t miss Friday night Rumble on the River fireworks over the river at 9pm. The kids tug is at 11 am on Saturday. The actual tug is from 12 to 3pm at the tug site.

Tug fest is a tug of war competition over the Mississippi river between two states Iowa and Illinois. The 2400 feet rope is pulled by tug teams across the river and the state with most points win. Local businesses form teams to compete in the tug. Tug fest is possible with the help of local sponsors and hard working volunteers. Also, the bands are amazing at the Gazebo. I like the music, fireworks,the river, and of course the actual tug. Combine your tug fest visit with the annual Floatzilla  on August 15th to make it even more fun.

River Roots Live: The 11th annual River Roots Live is on August 28th and August 29th at 400 W Biederbecke Dr, Davenport in the LeClaire Park. I like their new website though developed by Nerdwerx! The admission is free before 3pm on both days. Gate admission is $15. River Roots Liveis clubbed with the rib fest. The ribs are open at 11 am on both days. Music starts at 5pm on Friday and runs all day on Saturday.

This year’s line up includes artists such as Kacey Musgraves at Saturday 8.45 pm and Hello Goodbye at Friday 10.15 pm. Visit the River Roots Live for lots of ear popping and heart throbbing music. The Junior Jam for children is sponsored by West Music and RME. There are bouncy house for kids and also a video game tent sponsored by Video Game Etc. Check out all the free stuff given away by local businesses apart from the fair food.

You can also hop on the channel cat taxi and Celebration Belle cruises or checkout the Backwater Gamblers in Rock Island. Attend these events and let me know which one you like the most and share if you find any  more interesting.:)

The Museum of Science and Industry – Chicago

The rarest gem in the heart of Chicago is the Museum of Science and Industry (MSI). Located at 5700 S. Lake Shore Drive, the MSI stands as a bridge between the science of the past and future. I like it the way they focused more on future rather than just a display of past scientific artifacts.

Admission

The Museum of Science and Industry is a must visit attraction in Chicago. It pretty much takes up the whole day to explore all the shows and exhibits or it may take couple of visits to explore thoroughly. 🙂 Museum of Science and Industry is open 9.30 am to 5.30 pm most of the days with some exceptions. Basic admission to the MSI is $18, but they have other membership options and different packages such as the Explorer and Citypass. Parking is $22 at the museum or you can explore off the street parking in the Lake Shore Drive. Museum of Science and Industry offers free days for Illinois visitors on certain days year round.

Exhibits

MSI
Courtesy: The Museum of Science and Industry, Chicago


The Museum of Science and Industry began operating in 1933 and is house of more than 35,000 artifacts in its 400,000 square feet facility. MSI has many youth camps and field trips for children of all ages.

Here are some of the captivating exhibits of the MSI:

  1. Science Storms: Features the science behind seven natural phenomena such as tornadoes, tsunami, lightning, avalanches, fire, sunlight, and atoms in  motion. For example, at the tornado exhibit, you can control the speed and direction of the tornado with the controls at the site. At the tsunami exhibit, you can control the type of the waves and speed of the waves and see how it affects the shore. They have an original NOAA tsunami DART II buoy that washed to the shores in 2006. You can experience the winds at high speeds and reaction to your body in the wind tunnel booth.Science storms exhibit is free with museum entry and is a must see.
  2. You! The Experience: This interactive exhibit highlights the human body and the choices and we make everyday. You can see a huge display of human bones. You can see is if your body parts are really at your age.  Explore the possibilities of personalized medicine based on your DNA. You! The Experience is a permanent exhibit and is free with museum admission. Do visit this exhibit to know a different side of you.
  3. U-505 Submarine: The German submarine captured by the US soldiers during World War II and is now a national memorial landed in the Museum of Science and Industry. The Submarine features a variety if artifacts such as the original uniforms, photographs, letters, can of food from the war. There are a variety of interactive games such as the bunkers and operations of a submarine. The optional on-board tour will take you through a narrated tour of the U-505 submarine. This is a permanent exhibit that needs an extra ticket apart from the general admission.
  4. Transportation Gallery: The Transportation Gallery features all kinds of vehicles humans have used to move from one place to another. It includes original steam engine,United 727 airplane, race cars, and so on. Do not miss the flight simulators for an extra $6 for shared ride and $8 for fly. The simulators put you through the flight situations that is a fun way to learn! You can buy the tickets for the simulators at the exhibit itself. The gallery is free with museum admission.
  5. Art of Bicycle:  The Art of Bicycle exhibit features bicycles from 1800s and also cutting edge bicycles. You can see the bicycles evolution through ages and how humans designed bicycles through the past years. My favorite one is the elliptical bicycle. See the bikes that are made up of the same material of defense grade and see how science is incorporated in to the design of the bicycles. This exhibit is free with museum admission.
  6. Future Energy Chicago: The 90 minute interactive show explains the importance of energy conservation in Chicago. The audience is divided in to groups. Each group is assigned a challenge activity to design energy-efficient cars, neighborhood, house,  power supply grid, and transportation system to make Chicago energy-efficient. You will be engaged throughout the guided activity. Each team is graded on points for each activity and team with most points win. We scored second which was not bad after all! The exhibit has an extra admission fee and I think is a modern way of incorporating energy conservation in to our minds.
  7. Robot Revolution: My favorite of all the exhibits is the Robot Revolution. It features modern robots and how they are doing day-to-day activities such as surgeries, vacuuming, drones, information collection, and handling tasks. The robots are interactive and there is even a pet robot for hospital patients which moves when you pat it! There are soccer games and mimicking robots which you can enjoy. The drone show at the end of the hall demonstrates how technology is useful in times of emergencies and natural disasters. You can play tic-tac-toe with a robot and play a game of blackjack with another! Build your own robot at the end with the robot cubes and see robot engineers in work. The Robot Revolution is sponsored by Google and costs extra apart from the MSI admission.

Omnimax Theater

The omnimax theater is the largest theater in theater that is five-stories, wraparound and dome-shaped in the Museum of Science and Industry. The shows cost extra apart from the museum admission. The shows last about two hours and it is better to plan your museum trip based on the time of the show. Currently, the omnimax is featuring Journey to Space and Humpback Whales. It is a must visit if you are a first time visitor. In addition, the theater offers a cool place to rest when you are tired from all the walking, driving, and excitement. 🙂

The Cafe

The Museum of Science and Industry has a cafe which has burgers, french fries, salads, smoothies, juices, cool drinks, noodles,  and hot dogs. The cafe is pretty much crowded. They let you pick the food you want and pay at the end so you can enjoy your food in one of their dining areas. Water is free and remember that no food is allowed back into the museum. The restrooms are nearby the cafe and there is also a Starbucks inside the MSI!!!

I pretty much enjoyed the visit but wish I had more time to see exhibits such as  Numbers in Nature – A Mirror Maze, Coal Mine, and Materials Science. Let me know how you liked the Museum of Science and Industry in Chicago. It is a must visit for all ages and is certainly geared towards the future science revolutions. The  museum will certainly light up the creative minds and leaves us wondering whats next? Do visit the Museum of Science and Industry in Chicago and let me know your favorite exhibits. 🙂

All About Driving License

If you are new to the USA or to the Quad cities, one thing you certainly need is the Illinois driving license. Due to the limited public transportation and the extreme weathers, the driving license has become indispensable. It also serves as a state ID apart from letting you go places. However, there are certain requirements with respect to documents, vehicle, tests, and of course certain fees for a test. Here is an overview of the requirements for obtaining a driving license.

Intersection

Documents

The DMV certainly needs to verify your documents in order to take up the written test or road test. They need to see a valid unexpired original document from four groups. They must be most recent or within 90 days from the date applying. For example:

  1. Group A: Written Signature – Cancelled check, Major credit cards, Passport, EAD Card, I-94, Green card, Social Security Card, Current Driver’s License, State ID, and so on.
  2. Group B: Date of Birth – Passport, US Visa, Green card, EAD Card, Birth Certificate (US), Social Security Award Letter, Military ID, Naturalization Certificate, and so on.
  3. Group C: Social Security Number – Social Security Award Letter, Social Security Card, Driver’s License Record, Military ID, and so on. TVDL applicants no more required to submit a No SSN Letter. They will sign a declaration at the DMV.
  4. Group D: Residency – Bank Statement, Cancelled Check (within 90 days), Utility bill, Official mail from US Federal agency, Rental or lease agreement, Credit report, Pay stub, Electronic deposit, and so  on.

One document may satisfy more than one group. Illinois DMV does not accept photocopies. They need originals. New drivers must submit one document from Groups A, B, C, and two documents for Group D.

Vehicle

Your vehicle must be running with a valid insurance card. The vehicle must be running with all indicators working and with no problems. The vehicle:

  1. Must comply according to the Illinois Secretary of State standards
  2. Must have a valid insurance which is required before the road test
  3. Must display front and rear licence plates with unexpired license sticker
  4. Must be driven to the DMV by a driver with valid license and insurance

Tests

You are required to take a written test and a road test. At the DMV, first you have to take a token for a written test. The written test is a computer based test and covers the road signs, basic rules, seat belt requirements, and so on. You can skip a question if you think it is confusing. As soon as you answer thirty-five questions the computer will inform you that you have passed the test.

//


Then, you can take a token for road test. A tester from the DMV will accompany you on a short road course with real traffic. The tester will test if you are able to follow directions and instructions properly. They will grade you on certain key aspects such as uphill, downhill, backing from a driveway on to a road, yielding, lane changes, parking, and so on.

Fees

You are required to pay a fee for the computer test, written permit, and road test. The fee varies from $25 to $40 depending upon your age and type of test.

Make sure you have all original documents and take extra photocopies. Check the weather and road conditions before you go. Also, check the national holidays and working hours of the local DMV. It is better to go in the early hours so you can finish off early. You can expect two to three hours before the entire process is completed.

Training

If you are new to the USA or to the Quad cities, it is suggested to go through a trainer who will guide you through the entire process. The trainer with a valid vehicle and insurance card can guide you through the rules and regulations of the road. It is better to take four to five classes before you go for the road test.

All the best for your tests and experience at the Illinois DMV. They are here to help us if we have everything what they need. Let me know your experience through the comments section. Have fun driving and enjoy the new-found freedom. 🙂

H4 EAD

In the latest immigration reforms, the Department of Homeland Security (DHS) has announced that they would start taking applications for H4 EAD starting May 26, 2015. While some Americans may perceive all immigrants as aliens, this particular rule is about to bring the sunshine in many peoples’ lives.

Citation: http://states.aarp.org/wp-content/uploads/2014/06/Back-to-work-image.gif

Working and driving are common privileges enjoyed by many in the USA. These privileges do not come easily for certain immigrants. Spouses of legal immigrants are not allowed to work in the USA as per the previous rules. As part of this, many lives have suffered through depression for most part of their adult life.

H4 Visa

H4 visa is granted to the spouses and children of H1 visa specialists. The H1 visa specialists are allowed for a temporary stay in the USA. H1 visa is also a dual intent visa which allows the applicants to convert their non-immigrant  status to immigrant status. Based on the waiting list and availability of visa numbers per country of origin, the wait time is typically ten to fifteen years until the H1 visa immigrant gets their green card.

However, the spouse of an H1 visa non immigrant is aware that they cannot work in the USA prior to arrival. But, they hope to get the work permits as soon as possible. The centuries of wait time without the right to work has been heavily effecting the H4 visa holders. Some have decided to return back to their home country. Some have dread along the long wait hoping for better lives.

New Rule!

According to the new rule, H4 visa holders may allowed to apply for a work permit if their H1 visa spouse have already applied for a green card and have their I140 document approved. Or, if their H1 visa spouse has been granted extension of stay beyond six years according to the AC 21 rule.

The right to work and earn has been a boon to the H4 visa holders, as this gives them the opportunity to prove their worth in terms of earning potential and have a better lives for their family. If you are a H4 visa holder or you know someone, the time has come to prepare for the change. Applicants are encouraged to polish their skills for the current job market. In addition, they are also required to pay a fee of $380 as the processing fee. They may also need the documents such as a valid passport,  valid visa, marriage certificate, H1 visa holders I797, H1 visa holders passport and visa, I140 approval document, and so on.

List

Here is the checklist you will need for applying H4EAD. Download the latest forms from the USCIS website. Make sure you take two latest color photographs and sign with a black pen inside the box. There have been rejections just for that! If you have never worked and you have no prior SSN, here is the list. It is also better to include the cover letter titled ‘Original Submission’ and list all the documents you are attaching. All are copies except the photographs and check. 🙂

  1. G115 form
  2. I765 form
  3. passport old and new all pages
  4. I94
  5. I797A
  6. I140
  7. Marriage certificate
  8. Photo 2 – name, I-94 on back(Write with pencil)
  9. Driving licence
  10. Spouse passports all pages
  11. Spouse payslips
  12. Spouse 3 yr W2s
  13. $380 – ‘U.S. Department of Homeland Security’
  14. USCIS – Address as per your WAC number
 Let’s hope the new rule will allow the H4 visa holders improve their mental and financial status in the USA. This will also help the country in turn in terms of skilled resource and improved economy.

Temporary Visitor Drivers Licence (TVDL) New Updates

Continuing my articles about Temporary Visitor Drivers License (TVDL), here are some updates based on the new government regulations. You may not need some documents any more but still have to visit the nearest DMV office which processes your TVDL.

P1020721

Non visa Undocumented TVDL

TVDL is issued to temporary visitors to the United States in order for them to carry out their day to day chores. It may not be the same license issued to the Social Security Number (SSN) holders. Illinois started issuing TVDL for non visa undocumented drivers since January 2013. The documents required will  be address proof, consular card, twelve months of residency in Illinois and any current driving license from the same state or other state.

Your local Department of Motor Vehicles (DMV) will be able to process your DMV for non visa TVDL. Drivers are requested to schedule an appointment online through the website of Secretary of State. You can also call the toll free number and schedule an appointment. 855-236-1155. However, there are limits on the number of attempts you can make an appointment. After the documents are verified, you may require to take a vision test, computer test, and road test. If you are renewing your license, you will require only vision test. Your TVDL will be issued at a later date after completing a facial recognition background check.

Visa TVDL

TVDL is also issued for drivers with valid visa who do not have a social security number. Earlier, they were required to submit a SSN denial letter along with the documents. This document is not required anymore. You will still need two proofs of address, unexpired passport, I94, valid visa document. If you do not have two address proofs, a certificate of residency from a person with a valid SSN is also accepted. Visa TVDL will also be issued two weeks later after facial recognition check. You will be given a temporary driving permit which will let you drive until your TVDL arrives in mail.

While some may be totally unaware of this process, it is a good opportunity for drivers. It is also a cumbersome process to get a TVDL. After all the effort, a TVDL can be used only for driving purposes. It is not a valid identification for boarding airplanes or entering a federal facility. Uninsured drivers or drivers with DUI may face severe punishments or suspension of TVDL. Also, check in other states if your TVDL is valid there.

Let me know how your experience with the DMV went and share your license routines. 🙂


Insurance Totals Your Car: That’s not the end of the world

If you were in a wreckage recently, the insurance may declare your car is totaled. Okay, that is a bad news but may not be the end of the world. Getting a comprehensive coverage and rental reimbursement is your next step before shopping for the new car.

Car Totaled!

It may be pretty shocking to hear the news but you may have to let the vehicle go. It may be dear one for you which gave you a long company and assistance in all conditions and weathers. However, if the insurance decides that the cost to repair the vehicle is more than the market rate, they will decide to total your car.

Most insurance offer a replacement car for a similar make and  model in your area. Others, may offer you a settlement amount. Your negotiation skills must come in handy while negotiating for the amount. The insurance adjuster may have a long queue and have a long wait times before they can get to your claim.

Remember that it is your responsibility to follow up with the insurance and adjusters to process the claim. Make sure you do your homework before negotiating a settlement amount. Kelley blue book, NADA guides, carport and autotrader are some of the websites which let you decide the amount of your vehicle depending upon the mileage and year of the model. If you have any repairs or towing reimbursements, make sure to mention the same with the adjuster.

You may keep the vehicle by buying it back from the insurance, but may have to deal with the repairs. If you have a loan on the vehicle, the insurance will pay the titleholder bank first and get you the remaining amount. You may have to sign a Power of attorney to clear the amount.

Insurance Components

Driving an automobile is very simple and at very risky at the same time. Sometimes, you may be involved in an accident for no fault of yours. Floods, blind spots, fire, falling trees, bad weather are also some of the reasons a vehicle may be damaged beyond repair. Most insurance buyers aim for collision coverage but may overlook such incidents. Although it is going to cost you more, it is better to add the comprehensive coverage to your auto insurance.

Next, essential component is adding rental reimbursement in case your car is totaled. You will need an alternate car while the body shop or dealer is looking at your car’s damage. It may take some time to get a new car or alternate option. Some insurance do offer rental reimbursement up to a certain amount per day.

You may also want to add Emergency roadside assistance to your policy in case you have a minor or major accident. The roadside assistance may come in handy in case of a minor breakdowns such as flat tire or battery down. It also is useful in case of a major accident in order to tow your vehicle.

It is an unexpected loss when your car is totaled, but you have to remember that you and family members are safe and start shopping for a new vehicle.